How to Connect to Cisco VPN
Enterprise users always have the problem of how to connect to their corporate VPN server. Usually corporate uses Cisco VPN, which is a little difficult to connect than other VPN. Fortunately we have solutions for several different platforms.
Information You Will Need
Before connecting to the VPN, you need to know the following information. Ask your network administrator if you don’t have this.
- VPN Server Address
- Group Name
- Shared Secret
- your username
- your password
Sometimes you may need a RSA token, either a hardware token or a software token exists in your cell phone. This does not affect the way you connect to the VPN – just use your token as your password.
Mac OSX
Mac OSX and iOS support Cisco VPN natively so you won’t take too much effort to make it work.
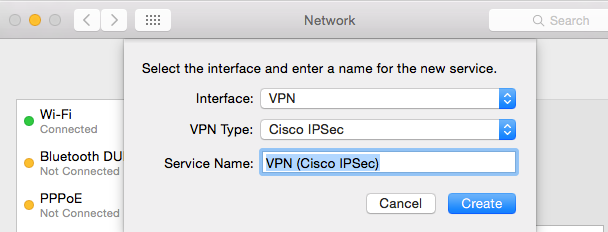
- Open System Preferences, then select Network.
-
Click the + button at the bottom of the network list to create a new connection. Set “Interface” to “VPN”, and choose “Cisco IPSec” for VPN Type. Enter a proper name in Service Name for your VPN connection.
-
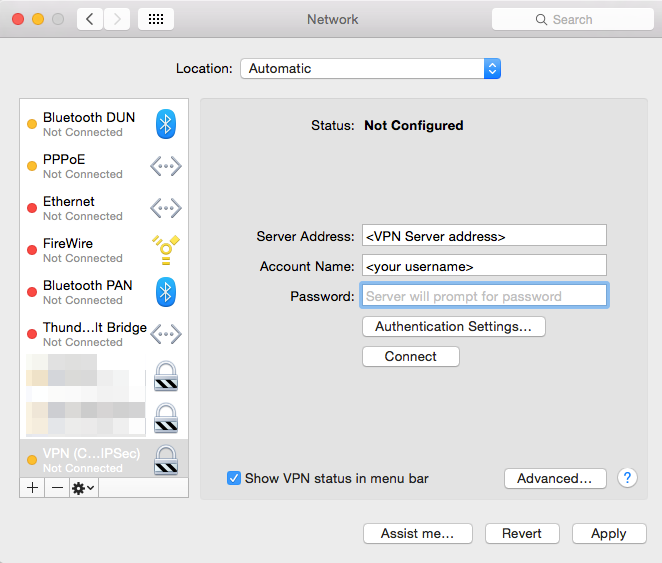
Click Create, then enter your VPN info in the new connection as below. You can leave Password field blank if you are using a token, or just want to type it when login.
-
Click Authentication Settings…, and enter your Group Name and Shared Secret and click OK.

You’re done! You can connect to VPN from the Network panel, or check Show VPN status in menu bar so that you can connect easily from your menu bar.
Windows
Unfornately Windows does not support Cisco VPN by default so you have to download the Cisco VPN client. You can download the VPN client with the following links.
Download 32-bit Windows 7 / Vista / XP VPN Client (version 5.0.07)
Download 64-bit Windows 7 / Vista VPN Client (version 5.0.07)
After installed the VPN client, start it by clicking VPN Client (you may need to search from your Start Menu).
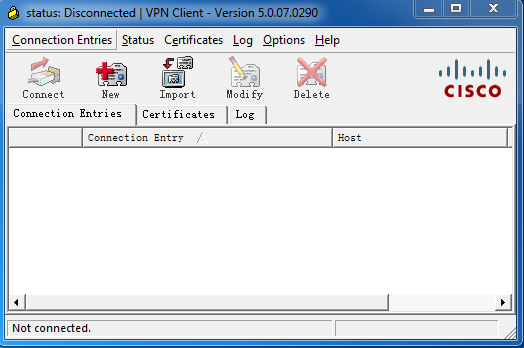
Click New, then enter your VPN info.
- Connection Entry: connection name, use whatever you like
- Description: whatever you like
- Host: VPN server address
- Authentication tab: choose Group Authentication
- Name: your group name
- Password and Confirm Password: your group shared secret
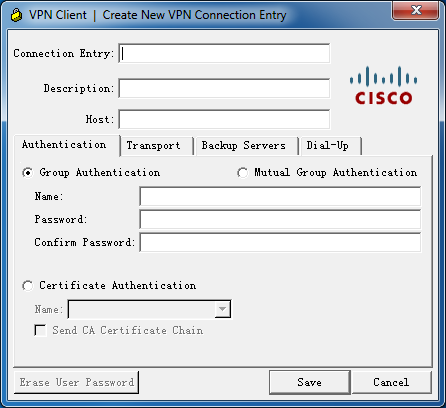
Click Save, and you are ready to go. The client will ask you for your username and password when you try to connect.
Linux
A pakcage called vpnc works perfectly for Cisco VPN. Use Ubuntu for example.
-
Install
vpnc.$ sudo apt-get install vpnc -
Edit
/etc/vpnc/default.confto enter your VPN info.$ sudo vi /etc/vpnc/default.conf IPSec gateway <your VPN server address> IPSec ID <your group name> IPSec secret <your group shared secret> #IKE Authmode hybrid # comment out this line Xauth username <your username> #Xauth password <password> # comment out this line to type password when connect -
Connect to the VPN.
$ sudo vpnc
To disconnect from the VPN, run
$ sudo vpnc-disconnect
iOS
As mentioned before iOS supports Cisco VPN natively. Here’s how to setup:
- Open “Settings” and choose “General” -> “VPN”
- Click “Add VPN Configuration…”
- Choose “IPSec”, then fill the fields with your VPN settings.

Android
Android does not support Cisco VPN either, so you need this app VpnCilla. It’s not a free app though, however you can install the Trail version before you buy it.
“New connection” dialog will appear for the first time boot. If it doesn’t, you can click the “+” button any time to bring up the “new connection” dialog.
Tap each setting item to enter the VPN settings. The UI is descriptive enough.

Press Back button to return to the connection list. Tap the connection and here you go!